
DIY Joy Jars
Today, I want to share with you one of the most simple, yet effective self-care crafts you can engage in: Joy Jars.
What are Joy Jars?
Joy Jars are repurposed containers (I prefer glass jars, but you can easily do this with empty coffee tin or any cylindrical container) filled with strips of paper with thoughtful messages written on them. These messages can be self-affirmations (i.e., “I am worthy of love,” “My boundaries are valid and necessary,” “I deserve respect,” etc.), joyful memories you have (which you can continuously add to your jar), things you love about yourself (i.e., “I love my hair,” “I am smart,” “I am proud of myself for doing [blank],” or something else that makes you happy. The idea is that when you need encouragement, a reminder of happy times, or are in a bad mood, you can pull these messages out at random and reflect on the notes you’ve left for yourself.
At first, the process might feel silly. You might find it meaningless or a waste of time, but reminding yourself of positive things in life or reflecting on things that you deserve or love about yourself is a really good way to help boost your self-esteem and improve your mood.
Sometimes reminding ourselves that we are valuable is the only encouragement we need to stand up for and believe in ourselves. Of course, Joy Jars alone are not the solution to all of your problems, but they are a way to help remind us of what makes us valuable and important.
If you decide to fill your Joy Jar with self-affirmations or positive thoughts about yourself and you are having a hard time coming up with messages, try to think of it as though you are writing messages to a loved one. We are seldom as kind to ourselves as we are to those we care about.
How to Make Joy Jars.
Here are the step-by-step instructions for Joy Jars, plus some advice depending on how much time you have and how creative you’d like to be. Remember, there are many ways to decorate your jar. This is just the method we use at our pop-up self-care events.
The tools you’ll need are:
A cylindrical container (glass jars, coffee tin, etc.)
Twine or ribbon
Construction, craft, or scrapbook paper (whichever you prefer!)
Scissors
A pen or marker.
Optional tools:
Hole puncher
Strong-hold glue
Step 1: Picking Your Jar
First, you’ll want to find a cylindrical container. I prefer to repurpose glass jars from candles or food containers (such as pasta jars). However, cleaning these off can take up a lot of time. If you don’t have a lot of time, using a mason jar is good enough. For those of you who would love to repurpose your glass candle jars, here’s simple how-to’s on removing wax from candle jars.
Please be careful if you decide to clean out an old candle jar! Working with extreme temperatures can be dangerous, especially when used on glass. When glass is exposed to extreme temperatures, it can be easily broken. Just be mindful and careful and know that there are other jars you can use if you are uncomfortable repurposing a candle jar.
All containers have their own pros and cons and they should be considered when choosing your jar:
Candle jars are great if they come with a lid because the lid can easily be popped off. However, they can be difficult to clean and the glass tends to be thinner. If you’d like to decorate your jar (see Step 2 for decorating tips), your options can be limited.
Mason jars are fantastic if your jar is filled with memories. Many mason jars come with two-part tops (pictured below). If you're filling your jar with memories, simply take off the flat lid and screw on the outer lid and you’ll have a nice hole so you can easily add more memories. You could also just leave the lid off all together, but I think the lid can be a nice touch, especially if you add some type of fabric or wax-film over the top and put the outer lid on over top of it. Again, if you’d like to fully decorate your jar, this may not be the best option.
Other types of glass jars like pasta jars are great because they’re convenient. It’s also a great way to reduce waste. However, unlike candle jars the lids on these jars might be twist-off. If you have difficulty twisting off jar lids, then this may not be the best option for you.
Coffee tins or non-glass containers are great because you have a lot more freedom to decorate your jar. For one, it can be easier to paint depending on the material. Feel free to get creative with these containers. Since coffee tins typically come with plastic, malleable lids, they are easy to cut a slit into at the top, just large enough to slip paper into. The lids also easily pop off. The remainder of this blog will focus on how to decorate glass jars, but if you decide to use a non-glass container, be sure to let us know how it turns out!
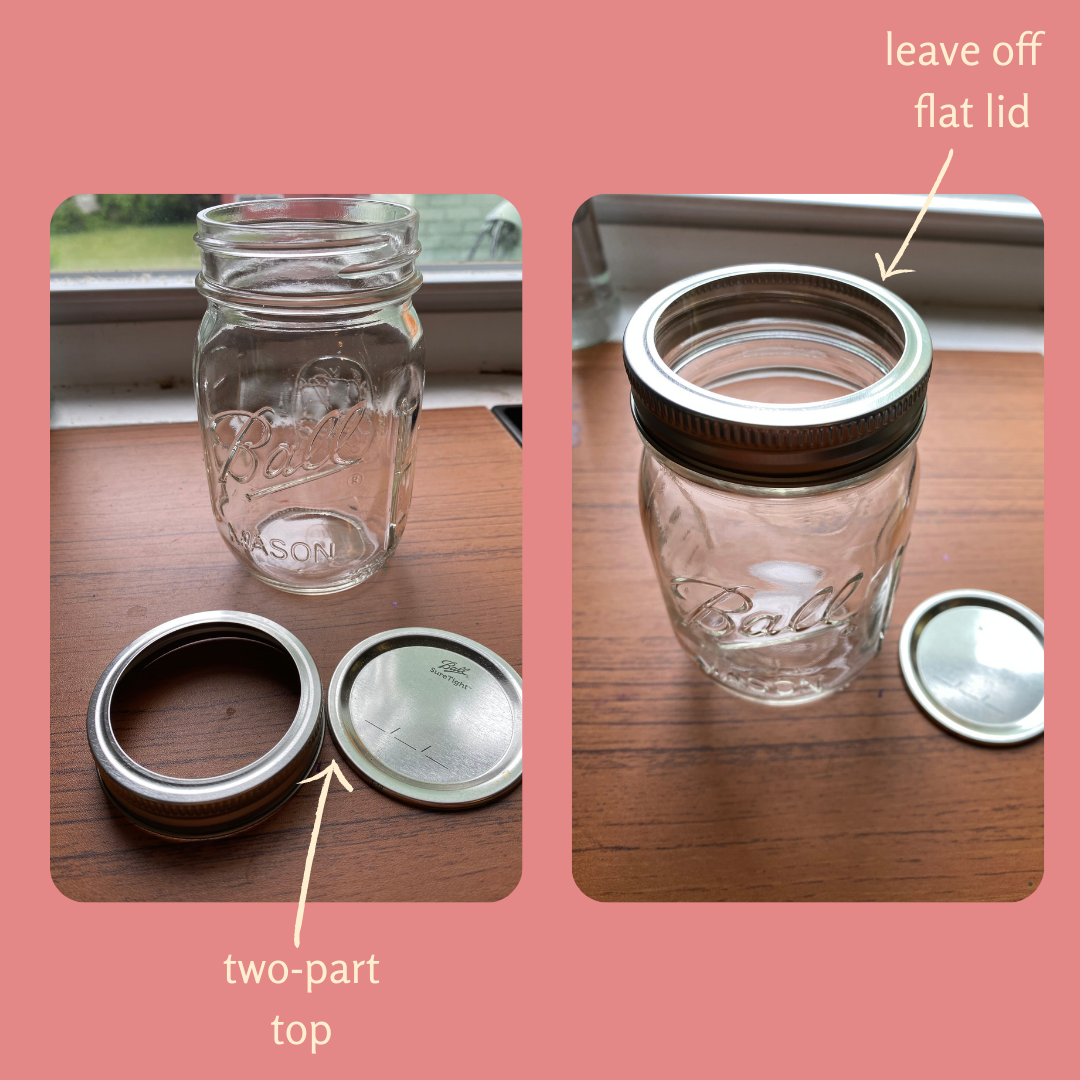
Left. Mason jar with a two-part lid.
Step Two: Decorating Your Jar
Now, if you decide to use a coffee tin or some other non-glass container, you can skip this step and move on to step three. I will be focusing on how to decorate glass jars, since the method I used is simple, cost effective, and quick.
First, you’ll want to take some paper, preferably in a design that you love. Scrapbook paper is really great for this, since you can purchase single sheets in your favorite pattern. Take the paper and cut it into a circle, heart, or any other shape. The cut out should be at least 2 in. x 2 in. This will be the tag for your jar. I put a couple of tags on my jar for decorative purposes, but one will suffice. Then, you’ll take your pen and write the title of your jar on the tag. Be sure to leave room to cut out or hole punch a hole into the paper.
When naming your jar, be creative! Let it represent what the jar means to you. Some name ideas for your jar can be:
[Your Name]’s Happy Thoughts
My Joy Jar
Little Pieces of Joy
Next, take your hole puncher or scissors and cut a small hole into your tag. Set it to the side when completed. You’ll need it shortly.
Now, take some twine or ribbon. Before cutting, wrap it around the top of your jar (just under where the lid rests when the jar is closed). Some jars have a short “neck” (like mason jars), so you can wrap it around that. I won’t be providing a specific length since your jar might have a different circumference than mine, however you’ll want to make sure the twine or ribbon can wrap around the top/neck of the jar at least once with some extra length so you can tie it. For aesthetic purposes, I prefer to wrap the ribbon around the top twice with some extra length. Cut with scissors when you are satisfied with the length.

Right. Mason jar, cut-out tag, and twine.
Once your twine or ribbon is cut, wrap it around the top but don’t tie it yet! If you cut the string long enough to wrap it around the jar twice, wrap it once around the jar so that the two ends are very long, but somewhat secured around the top.
Regardless of if you decided to make the string long enough to wrap once or twice, before tying, you’ll slip the tag you created onto the string. Once you’re happy with the position of the string and tag, simply tie it into place. It will not slip, (even on jars without necks) as long as it has been secured tight enough. If you do notice some slipping, using strong-hold glue can be helpful (depending on the material of your jar and string).

Left. Example of what the tag looks like once the twin has been laced through and tied.
Step 3: Filling Your Joy Jar
Once your tag has been attached you can move on to filling your jar with messages. Simply take your construction/scrapbook/craft paper and cut it into strips. (Get creative with this by combining different patterns and colors that compliment each other!)
You’ll want to be sure that the strips are long and wide enough to write on. If your strips are too long for your jars, no worries! Just fold your paper strip in half to get it to fit.
Then, write whatever you want! If you’re trying to come up with positive thoughts on yourself or self-affirmations, please be exceptionally kind to yourself. Talk about yourself as though you were talking about someone you admire or love.
If you’re having difficulty coming up with ideas, just know that you don’t have to fill your jar up all at once. Come back to it when you come up with more messages to add. Forcing yourself to come up with ideas can derail the intentions of these jars: to bring you joy.
Step 4: Using Your Joy Jar
Put your jar in a place where you can easily access it, but is isolated enough that anyone you don’t want seeing it can get to it. Joy Jars can be as private as you’d like them to be and no one has a right to read what you’ve put in them.

Right. Completed Joy Jars.